EZ Grid® System
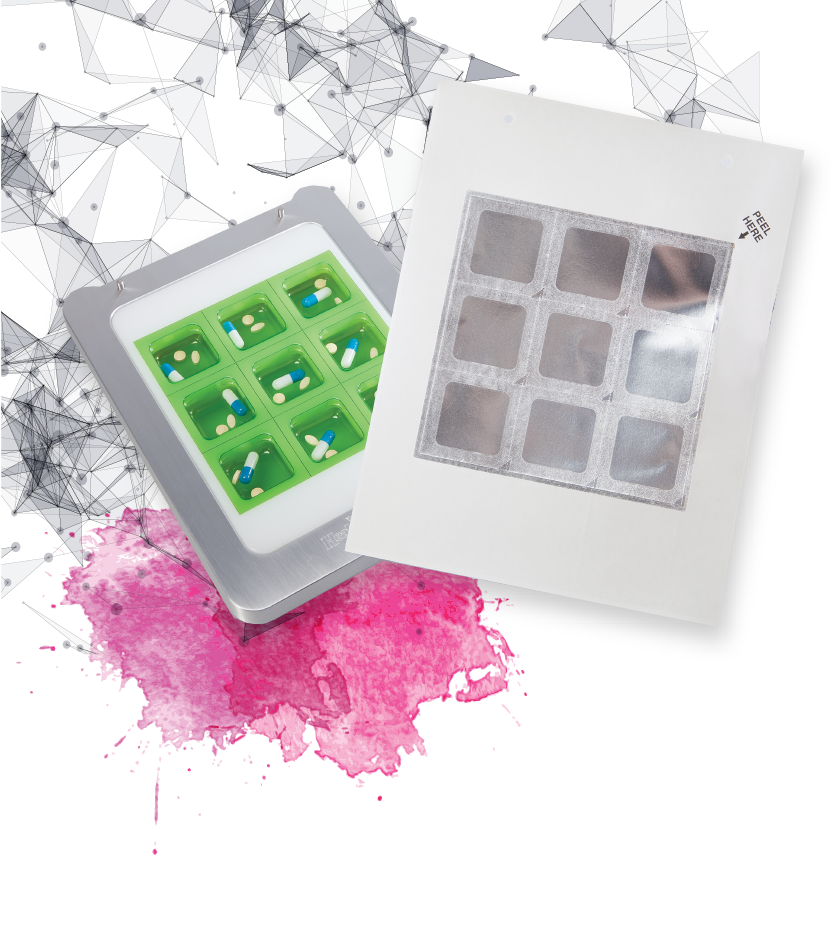
Problem: Misaligned labels on filled blisters, which create product waste and require extra time to repackage.
Solution: Designed in response to years of customer frustrations, our system ensures precise label-to-blister alignment every time. Centered around a sturdy aluminum frame with two locator pins, it uses interchangeable inserts together with blister and label sheets in 5x5 grids so there are no unused pieces and no waste to discard.
Design Notes: The idea for this system was brought to us by our Sales team through customer input concerning the need for a 5x5 blister system. We looked at the available options on the market to identify any gaps in cost and performance we could fill. This involved coordination with Sales, Purchasing, Product Management, Quality, Marketing and our current contract manufacturers.
We looked at the features available in our existing line that could be adopted into a new 5x5 system. Components that could be used included the paper/foil, adhesive type and format, as well as the current backer. For the blister, we could use the same material, but we needed to change the way it was molded for better control of the outside shape. Careful consideration went into the blister sizes and depths needed to be competitive in the market.
We spent quite a bit of time using our current label system — foam sealing tray, blisters and labels — and identifying areas for improvement: What could make it better? Had we experienced any complaints with it?
One common theme that kept coming up was label misalignment to the blister. In some cases, this would take several applications to get right. We knew we needed to take this into consideration with the new design.
We immediately started thinking about ways to contain the blister and align the label during application. Given that the blisters are thermoformed, it made sense to control the shape on the outside of the blister for any containment fixture. In thermoforming, one side of the sheet touches the forming side of the tool, which can either be a male (protrusion) or female (cavity). In this case the outside of the blister was more important than the inside, which meant we needed to use a female thermoforming tool.
We wanted to do something unique with the label, something that had never been done before, that might carry some intellectual property. This would provide us with exclusive rights to the product for 20 years.
What if the label did not work like a traditional label that has a peel-off backer? What if the backer peeled off the label and the instances were perforated so they could be punched out/torn away? We wanted a blister with tight control on the outside and a label that could marry the blister and simply tear away.
The first concept looked like one of the old-style credit card machines. Product Development Manager Doug Clouser remembers an early meeting with Product Manager Mallory Bostwick, whose knowledge of our products and how they are used was extremely valuable. Because this initial concept had many mechanical/moving parts with grooves and crevasses, she asked, “How will our customers clean the hard-to-get-to areas?” Jokingly, Clouser responded, “With a Q-Tip.”
Knowing Bostwick was spot-on, our design team went back to the drawing board. It is vitally important to include as many people in early evaluations as possible to streamline the design effort and to help narrow the development path.
The final iteration was a frame with drop-in inserts in round, slot and square options. The frame and HDPE inserts could be cleaned easily. The frame had a high-tolerance cavity that the insert dropped into for precise alignment and it had 2 dowel pins that matched holes in the label.
The label perforation would be locked to the pins by means of a rolling die set. This would ensure perfect alignment of the label to the frame. The blister would fit tightly within the HDPE insert. The result was a design that could be easily used and that would address the frustration of label-to-blister misalignment, a problem that had yet to be solved.
It took several months to get prototype tooling made to produce the label and blister. In the meantime, we had the frame and insert produced. Once everything came together the design worked as intended and proof-of-concept was achieved.
We immediately filed for a utility patent and began the work toward production tooling. This is usually when the development team can celebrate, but unfortunately in this case we still had more testing to do. New United States Pharmacopeia (USP) standards were just released and the label and blister needed be tested to the latest moisture permeation standard.
At first, we considered sub-contracting the testing out to a laboratory; however, we didn’t know how many tests would be necessary to achieve a passing grade, or how expensive it would be.
Our Quality department stepped up the plate and said we could build our own lab. This would provide us the means to perform unlimited tests. We tested the product for several months and finally achieved a passing grade.
Patent Pending